Choose your country / language

Measuring techniques for quality assurance of Oerlikon Balzers coatings

Standardized testing procedures ensure that all statements concerning coating quality are always reliable and comparable

Measuring techniques for quality assurance of Oerlikon Balzers coatings
Quality assurance testing methods
Method Attribute Constraints Precision Destructive for
Coating Substrate
Spherical abrasion Coating thickness Geometry, roughness 0.3 - 0.5 μm yes yes
X-ray fluorescence (XRF) Coating thickness Geometry, composition (element) 0.3 - 0.5 μm no no
Rockwell hardness (HRC) Substrate hardness Substrate hardness Geometry ± 1 HRC yes yes
Rockwell test Coating adhesion Substrate hardness Geometry ± 0.5 HF-Class yes yes
Colour measurement Colour of the coating Planar surface ± 1 CIELAB-unit no no
Contact stylus profilometer Roughness Geometry * no no

 * Function of test conditions

Determination of coating thickness using a spherical abrasion test

Determination of coating thickness using a spherical abrasion test

In this measuring technique, the dimensions of a spherical indentation, abraded in the coated substrate with a steel ball, are determined and used to calculate coating thickness.

1 Abrading ball of known geometry
Coating
3 Substrate
Coating with ball crater wear test (top view)

Coating thickness determined by spherical abrasion measurement testing. In scientific publications, this measurement technique according to DIN EN ISO 26423 (formerly DIN EN 1071-2) is also referred to as crater grinding (wear) test, ball crater (wear) test, or spherical-ground section – calo test.

Adhesion testing using the Rockwell method

Adhesion testing using the Rockwell method

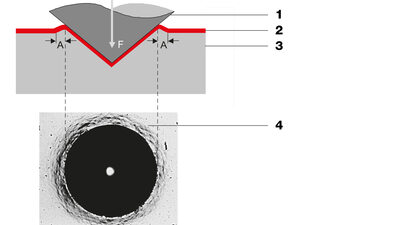
A conventional Rockwell hardness test (DIN 50103) is carried out, followed by an analysis of the network of coating cracks and flaking around the edges of the indentation using an optical microscope. Coating adhesion is then assigned to one of six adhesion classes.

1 Rockwell indenter
Coating
3 Substrate
4 Coating with spherical indentation (top view)

Coating adhesion testing using Rockwell indentation

© Copyright 2025 OC Oerlikon Management AG

Back to top keyboard_arrow_up

keyboard_arrow_up